Key instructions to preserve
📸 INPUT REFERENCE: Use the uploaded photo as the base — preserve every word, line, diagram, and mark on the document or whiteboard exactly as written, with zero alteration to actual content, text or numbers 📐 PERSPECTI
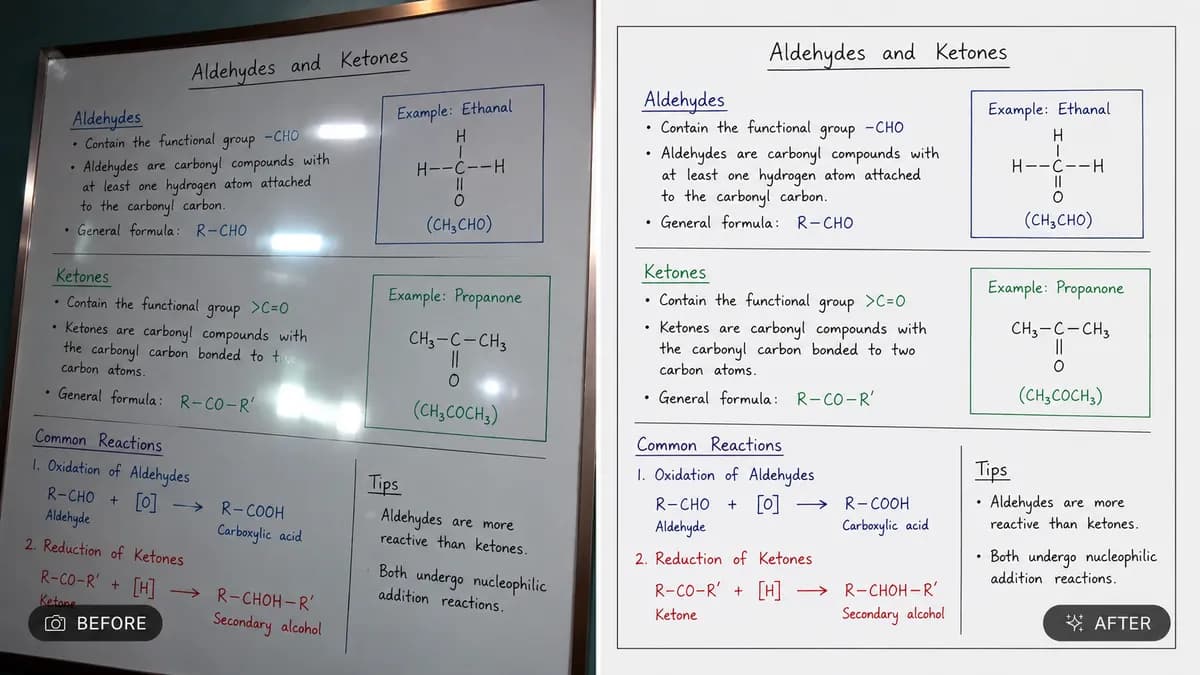
📸 INPUT REFERENCE: Use the uploaded photo as the base — preserve every word, line, diagram, and mark on the document or whiteboard exactly as written, with zero alteration to actual content, text or numbers 📐 PERSPECTIVE CORRECTION TASK: Detect the four corners of the document, page, or whiteboard in the photo and digitally straighten it into a perfectly flat, front-facing rectangular view, eliminating any skew, tilt, trapezoid distortion, or curved-page warping caused by the original camera angle 🔲 CROP & ALIGN: Crop tightly to the edges of the document or whiteboard, removing surrounding background (desk, hands, wall) unless specifically requested to keep margin context 💡 LIGHTING & GLARE CORRECTION: Remove uneven lighting, shadows cast across the page, and glare or reflection spots (common with glossy whiteboards or glossy paper) so the entire surface is evenly and clearly lit ⚫ CONTRAST ENHANCEMENT: Sharpen text and line clarity, increase contrast between background (paper/whiteboard) and ink/marker so content is crisp and easy to read, similar to a professional scanner output 🎨 COLOR NORMALIZATION: Correct the background to a clean, neutral white or whiteboard-accurate tone, removing yellow tint, shadow gradients or color cast from ambient lighting 🖌️ STYLE: Photorealistic scan-quality correction — final result must look like a professionally scanned document, not a distorted phone photo 🚫 CONTENT PRESERVATION: Never alter, add, remove, or reinterpret any actual written text, numbers, or drawn content — geometry and lighting correction only 📐 ASPECT RATIO: Rectangular, matching corrected document/ whiteboard proportions (typically 1:1.41 or as detected)
1 people have copied this prompt
Straighten and Scan Document or Whiteboard Photo is a transformation prompt for GPT Image 2, composed for a 16:9 image. 📸 INPUT REFERENCE: Use the uploaded photo as the base — preserve every word, line, diagram, and mark on the document or whiteboard exactly as written, with zero alteration to actual content, text or numbers 📐 PERSPECTI
📸 INPUT REFERENCE: Use the uploaded photo as the base — preserve every word, line, diagram, and mark on the document or whiteboard exactly as written, with zero alteration to actual content, text or numbers 📐 PERSPECTI
Keep the prompt structure, then replace the main subject, action, or environment in "📸 INPUT REFERENCE: Use the uploaded photo as the base — preserve every word, line, diagram, and mark on the document or whiteboard exactly as written...".
Adjust one visual signal at a time, such as "document scanner ai", "whiteboard photo corrector", "perspective correction photo", "straighten document", so you can identify which instruction changes the result.
Use the wide frame to establish the environment, place supporting details around the subject, and maintain a clear focal point.
Use one clear reference image and retain the identity-lock instructions when changing clothing, lighting, background, or camera direction.
Use direct natural-language edits after the first generation. State what must remain unchanged before describing the single element you want to revise.
Judge the result by how clearly it communicates the intended transformation direction while keeping the subject, environment, and visual treatment consistent.
Three simple steps to generate your AI image.
Click the "Copy Full Prompt" button above to copy the entire prompt text to your clipboard instantly.
Open your preferred image generator and paste the prompt into the text input. You're ready to create.
Hit generate and watch the magic happen. Tweak the prompt parameters to make it your own.